AI-generated avatars took social media by storm. Lensa, which is now the talk of the town, has already swept people off their feet.
Artificial intelligence image generators are the new trend. They help you generate images in just a few seconds.
Brands like Prisma labs, and Open ai are already leveraging the power of AI-driven image creators.
So, here’s the deal:
There’s no perfect time than now to invest in AI digital art generator app development. Because the market size of generative AI, which stands at over $10 billion now, is expected to hit $118+ billion by 2032.
This blog covers everything you need to know about artificial intelligence art makers and how to develop an AI digital art generator app from scratch.
Let’s get started.
What is an AI digital art generator?
As the name implies AI digital art generator is a kind of software that uses artificial intelligence to create digital artwork. This includes media, such as images and videos.
Some AI art generators are designed to create original works of art from scratch, while others are designed to replicate a particular artist’s or art movement’s style.
Here’s how it works:
AI art generators typically use machine learning algorithms to analyze a large dataset of existing art and learn about different artistic styles, techniques, and patterns.
That is, an artificial intelligence art generator can produce a work of art from the data you provide. This can include written descriptions and a wide range of visuals, including works of art created by humans, different types of selfies, and more.
Many different types of AI digital art generators are available, each with unique features and capabilities.
Some are designed to create realistic images or animations, while others are more experimental and produce abstract or surrealistic art.
AI digital art generators have many use cases, including creating promotional materials, designing website graphics, or generating original artwork for exhibitions, NFT creations, and more.
Read More : AI in App Development: Supercharging Feature Enhancement Strategies
How does an AI art generator app work?
The working of the AI art generator is complex. There will be combinations and learning of large datasets to produce an outcome.
The art or avatars are usually created by artificial intelligence, which has been trained on a dataset that includes various types of images, artworks, and more.
Then the app uses the data to create a unique image or video. Some AI image generator creates unique results that are different from the dataset available.
Usually, you need to give input to the machine, which explains your requirement. The input can be text or an image.
The machine learning algorithm will understand the requirement and analyze the data to provide unique and remarkable results.
Different technologies are used to create AI image generators; the most basic requirements are artificial intelligence, machine learning, and computer vision.
When a deep learning algorithm is used along, an AI visual generator can go beyond limits and produce artworks that give wings to our imaginations.
As AI and machine learning are set to evolve, the possibility of going beyond the limit is at top speed.
As the explanation becomes a little tricky, you need a well-experienced and top-notch technical team to build an AI digital art generator app like Lensa.
Tech stack needed for AI digital art generator app development
AI digital art generator app development revolves around the following tech stacks. Before you choose the tech stack, you have to understand your product’s requirements.
The most needed tech stacks are
- Node.js
- Javascript
- HTML
- CSS
- AWS
- Stable diffusion
- Google Colab
- DreamBooth
- Google Drive
- Hugging Face
- GAN (Generative Adversarial Networks)
- VQGAN+CLIP
Steps to develop an AI digital art generator app
The first step in the AI digital art generator app development is to understand the scope of your product. What kind of images will you produce and what input will you give? Once you’ve decided on this, you can start building your product.
Before we start training the AI, we need to understand the basic working of the following models.
Also Read : AI in Finance: Disrupting Traditional Banking and Investing
How does the generative model work?
Generative modeling is the use of artificial intelligence (AI), statistics, and probability in software to produce a representation or abstraction of observed phenomena or target variables that can be predicted from observations.
To enable computers to comprehend reality, generative modeling is used in unsupervised machine learning.
There are many generative models, we will look into the most popular ones here.
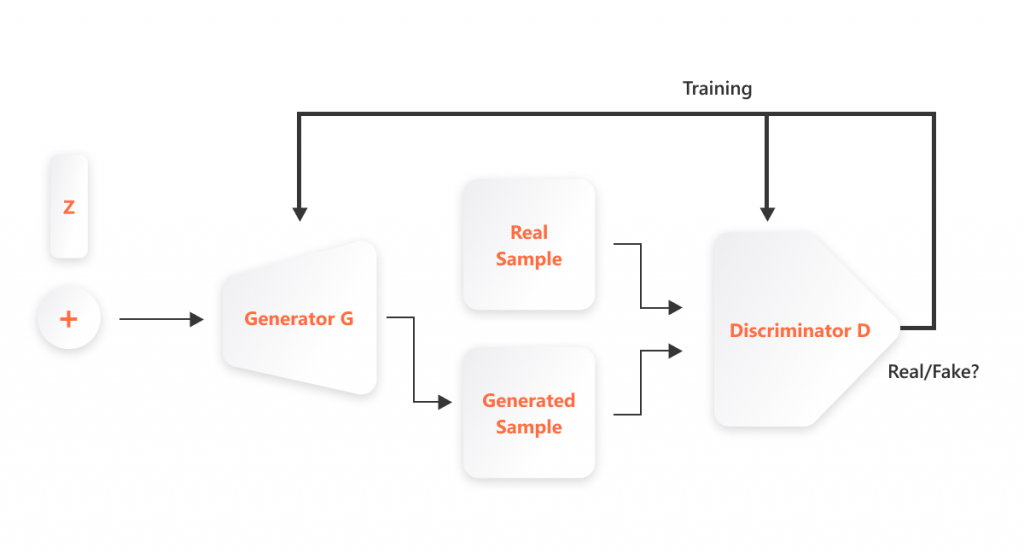
Generative Adversarial Networks (GANs)
The term “generative modeling” describes an unsupervised learning technique that automatically identifies patterns in inputs and uses those patterns to produce related outputs. By splitting the issue into the generator and discriminator networks, GANs arrive at the generative model.
The discriminator labels them as “genuine” or “fake,” and the generator attempts to produce new images. With this approach, the algorithm chooses the pictures that seem more “real” or more like the original information.
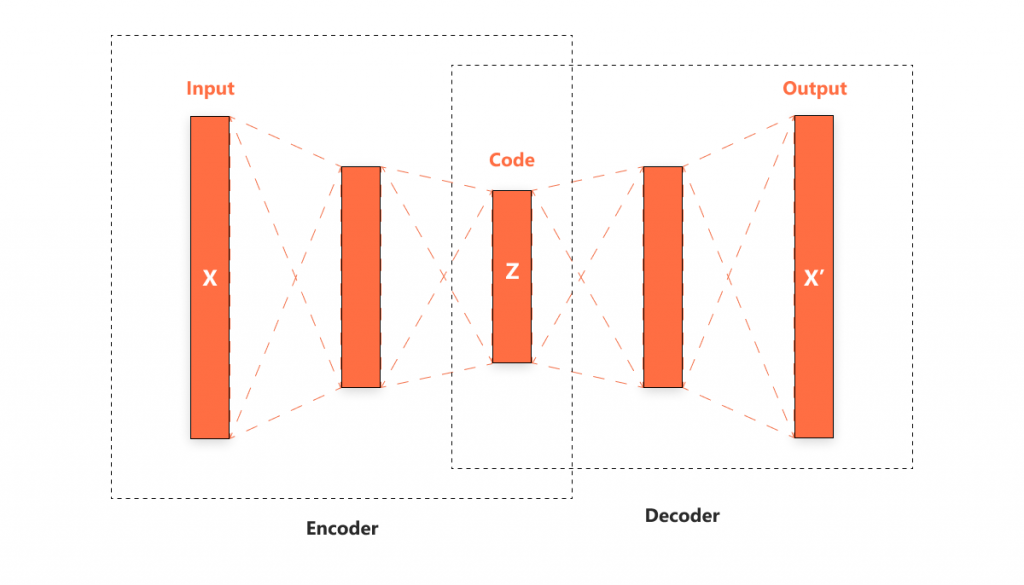
Variational autoencoder (VAE)
A neural network called an autoencoder compresses input to decode it from the resulting representation.
By using a multivariate latent distribution to compress data, VAE differs from conventional autoencoders.
The “code” section in the following image refers to the compression technique.
Diffusion models
Another generative model that produces high-quality photos is the diffusion model. When synthesizing images, they can produce work of a more excellent caliber than GANs.
Diffusion models first try to correct the corruption by adding noise while gradually deleting information from the data (denoising).
Stable diffusion
Stable diffusion uses an inflexible CLIP ViT-L/14 text encoder to render images based on the input text prompt.
Stable diffusion creates detailed images based on the text descriptions. It also creates image-to-image transcription, outpainting, or impainting as per the text descriptions. The generated images are similar to the text but are not replicas of the text provided.
The stable diffusion algorithm is trained on the large image dataset.
STEP 1 – Prepare content assets
We will train stable diffusion to create images in different styles and with high accuracy.
To train stable diffusion, we will be using DreamBooth from Google Colab.
Google Drive with enough space
To start, you need a google drive with a minimum of 9GB of space. You can use the free google account, which provides 15 GB of storage for free.
Reference image to train AI
You need 25 to 35 images with facial features captured neatly. The neatly captured image will be like
- Subject or person facing the camera
- Both eyes and facial features are clearly captured
- The best option is to capture in DSLR or mirrorless camera, a high-quality mobile camera
- 12 closeup face images and 5 mid-shot photos covering from head to waist is adequate
Setting up Google Colab
The free version of the Google Colab will be sufficient to run DreamBooth. But the paid version provides faster, high-speed GPU and 15 GB VRAM in hand to run DreamBooth. The voice is yours to decide on the paid or free version.
Once you sign up with Google Colab, Go to the “runtime” section or cells on the left. To play the runtime, click the play buttons one by one. Start the next runtime when the previous runtime is completed.
After some time, you will see a green check mark that shows the runtime is executed. You are now ready to start.
STEP 2 – GPU and VRAM
Now, we are going to start to train the AI model on DreamBooth. The initial step is to decide on the GPU and VRAM.
The paid users will have a much faster GPU and more stable VRAM. You need to decide on which type you are going to use.
Once you decide, you can click on the play button. Once you do, it will show a warning; just click on the “Run anyway”. This is because the GitHub – developer’s source website is being accessed.
Dig Deeper : AI Chatbots For B2B SaaS: The Top 5 Tools For Business Growth In 2023
STEP 3 – Start with DreamBooth and Hugging Face
Install the requirements and dependencies. Run the DreamBooth by clicking on the play button.
Once you click the play button, the following steps require you to log into your Hugging Face account. Create a free account on the Hugging Face. Once you log in, follow the below steps
- Open settings
- Click Access token
- Click on Create new
- Rename as you preference
- Copy the Access code
- Return to the Colab tab
- Enter in Access code on the Colab page
- Click Login
STEP 4 – Install xFormers and Connect Drive
Click on runtime, this will install xFormers. You just need to click the play button to install xFormers.
A popup window will appear. Click on “Allow.”
Confirm saving to Google Drive. Set a new name for variables. If you are going to upload a person, change the name to a man or woman. If it’s a dog face, change it into Dog.
Rename the
Input directory – INSTANCE DIR
Output directory – OUTPUT DIR
STEP 5 – Upload reference Images
Now you can add the reference image to train your AI. Add a minimum of 8 to a maximum of 20 images of your choice.
Once the upload is completed, check the images on the folder icon on the left side of the screen.
The images uploaded will be temporarily stored on Google Colab, not in Google Drive.
STEP 6 – Train AI using DreamBooth
This will be the crucial step as we start to train the AI. This includes two important steps.
-Instant Prompt – Create a unique name here
-Class Prompt – Add the name you gave in Step 5 – Man, Woman, or Dog.
Leave the other fields untouched. Now execute the runtime by clicking the play button.
Training the AI will require more than 15 minutes and upto 1 or 2 hours.
Step 7 – Converting AI model to ckpt format
Once the training is completed, you can change the format to ckpt. You can do it in two ways.
First – Download the script.
Second – Run conversion ( Reduces the download size and also the image quality)
Start the runtime. In the end, a file in ckpt format will be saved to your Google Drive.
If you close the dreamBooth Colab browser tab, your runtime will be completely deleted. You will be starting from scratch.
If you need the runtime for future use, you can save it in Google Drive rather than using Google Colab.
Step 8 – Prepare for Textual prompt
The newly trained model is ready for the textual prompt utilized for image generation in the next two runtime procedures under the “Inference” category. Each playtime can be finished quickly by just pressing the play button.
Step 9 – Generate AI images
You should use the exact name of the -instance prompt and -class prompt from step 7 to generate AI images.
For example – “Astronaut, digital painting.”
Now you can see the magic happening! AI images will be successfully generated.
You can generate more creative images using good text prompts.
Following the above-mentioned steps, you can create AI images that closely reflect the facial features from your reference images.
Benefits of using AI image generator
- Ability to produce high-quality images
- Anyone can create images and artworks on their own
- Quick and easy generation of large chunks of images
- Helps more for video game artists to enlarge their imagination with less span of time.
AI digital image generator app examples
Some of the upcoming and pioneers in AI digital image generator are
- Lensa AI art generator
- DALL E
- Stable diffusion
- WOMBO dream
- DALL E mini
- Google deep dream
- Jasper art
Future of AI image generators
As the evolution of AI and ML continues, there will be high domination of AI image generators in the social world. It helps create scientific images and will grow in that space.
We can’t predict the future better; if used correctly, tech is always great. In the future, AI can be seen massive adoption in many workplaces and industries to help minimize human efforts and save time.
Video creation will be the next industry in which AI image generation will slowly evolve into.
Dive Deep : How to Create a text-to-image generator like Craiyon
Takeaway
AI art generation development is in the initial stage, and many businesses are starting to explore the field. If you are thinking of making an AI image generator. Now is the best time to do it.
You need to handle a lot of tech and coding to make it a complete package. You need an expert tech team to make an AI digital art generator app from scratch. There are many app development companies in the market with a lot of expertise in AI and ML. You can rely on them to build your own product.
At NeoITO, we help entrepreneurs and businesses turn their ideas into reality with enterprise-grade tech.
Our AI and ML projects have produced tremendous results for our clients and projects. Check out our case studies to discover how we transformed many ideas into reality.
FAQ
Can I make my own AI art generator?
You need coding and knowledge about handling different tech stacks like AI and mL to build your own AI art generator.
Is there a free AI art generator?
DALL E2, Deep dream generator, and starry.AI are some of the most used free AI art generators.
Is there an AI that helps you make digital art?
You can rely on DALL E, Lensa, Mid journey, and Deep dream are some of the upcoming tools that help you make digital art.
What is the best AI art generator?
DALL E, Starry AI, and Jasper arts are the best free AI art generators. You can use Lensa to create an avatar which is a paid one.